
How to Build a Mobile Tool Cart
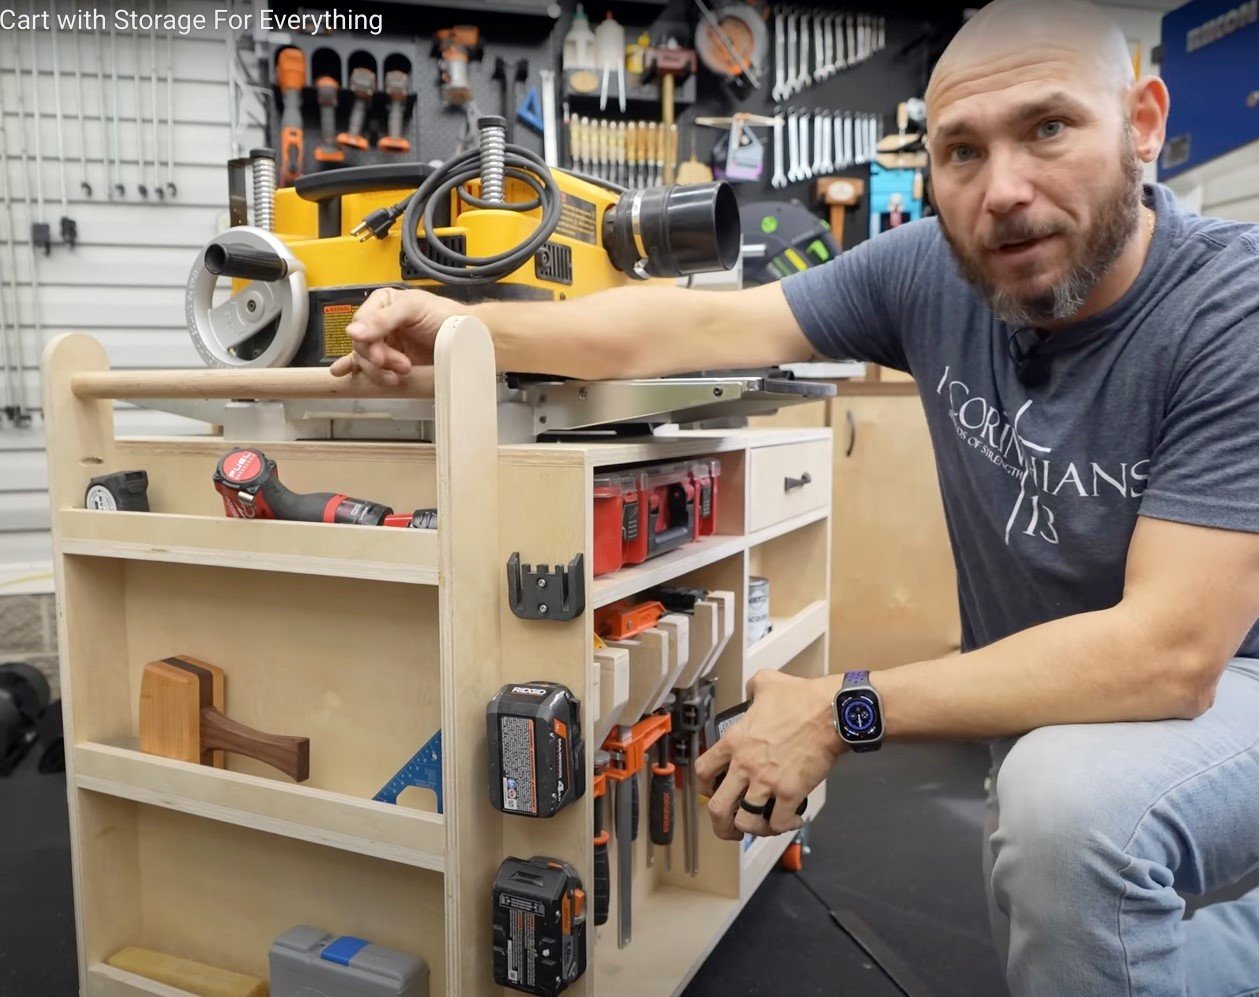
I’ll show you how to build a mobile tool cart that houses four big power tools and gives you a lot of storage. I show you all of the storage options on it then we’ll walk through how I made it.
All products used to build the cart, as well as the tools on the cart, will be linked below this article A link to the build plans can be found here - TOOL CART PLANS https://www.731woodworks.com/store/diy-mobile-tool-cart-with-storage
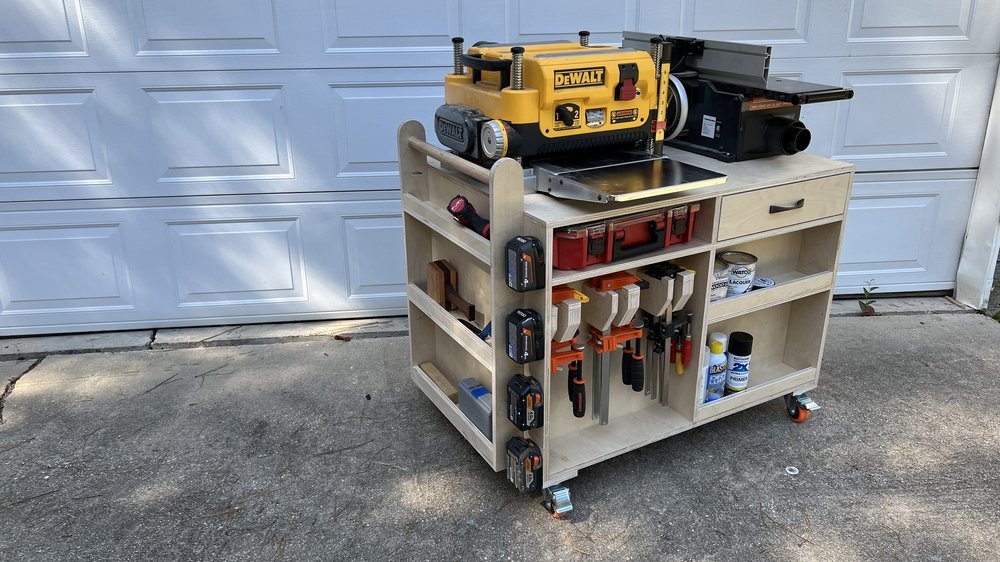
Completed mobile tool cart with storage
I started building this with two things in mind: First, I needed a place to house my benchtop planer and my jointer. Second, was keeping in mind the garage-shop woodworker like me. I’m in a small space, so I need to maximize storage options.

Back of the cart has clamp storage and shelves for other items.

Front of the cart has cabinets to house other tools like an air compressor and spindle sander.
Moving clockwise around the cart, on the right side I’ve got a cubby for small parts storage in a Milwaukee case. Below that, there’s storage for clamps up to 12”, a drawer for my PPE, and shelves for finishes. On the end, I’ve got a pull handle to more easily move the cart around and shelves below that for assorted-use items. To the right of those shelves are 3D-printed battery holders that I picked up from ShopNation’s Etsy shop, and to the left are brackets to house my 24” rules to keep them out of the way. On the left side of the cart, I’ve got another Milwaukee box for small parts, a drawer for the push blocks for my jointer, with two large cabinets below to house my air compressor, spindle sander, and the good old leaf blower.
One of the main reasons I used Milwaukee cases in place of drawers is so that when I’m planing boards, I can take the cases out, leaving an open space beneath my planer so I can pass boards back through in that empty space underneath. To make this, you only need 3 sheets of ¾” plywood, pocket holes for joinery, and I added a round dowel rod for the push handle.
Breaking down the plywood – I’ll always start breaking down my plywood to size using bench cookies from Rockler to support the sheet I’m cutting. When I’m spacing out the bench cookies, I’ll make sure I put enough out to support both sides of my cut. This way I don’t have to worry about pinching or kickback. Even without a track saw, you can still break it down this way with a circular saw.

Even though I used my track saw, and all of my pieces were extremely close, I wanted to make sure they were exactly the same. I re-sawed all of the panels on my table saw, with my fence set to 29 15/16”. With the panels all cut to specs, I did a dry-fit using corner clamps from TayTools. This will hold your corners nice and square. I did the dry-fit to check the height, so I can use my workbench as an outfeed table when I’m using my planer.
Power Tip – Whenever you buy sanded plywood from Home Depot, or Lowe’s, or even my local hardware store, you may notice some knothole fills that don’t really match the color of the wood. I personally don’t really think they look that great, so I try to turn those to the inside when I can.
Pocket Hole Joinery - I love pocket holes. I’ve been called the Pocket Hole King for a while now (called myself that, actually). I’m using the Massca M2 pocket hole jig. It’s super easy to set up using the markings on the front of the jig (in both metric and imperial) based on the thickness of your material. You then set the collar to the same thickness on the bit, and you’re ready to go. The jig is very nice. It makes very clean pocket holes, comes with dust collection, and is backed by a lifetime warranty.

I used the Massca M2 Pro Pocket Hole Jig for joinery on this project.
With the pocket holes drilled, I ran a bead of glue down the joint just for added stability. The 1¼” pocket hole screws are more than enough to hold everything together, but the glue adds a little stability and will keep the cart from squeaking while you use it. I used the corner clamps once again, but I’ve also got a special clamp that you can use. One end is designed to specifically fit into the pocket hole and clamp on the other side of your piece to hold everything together.
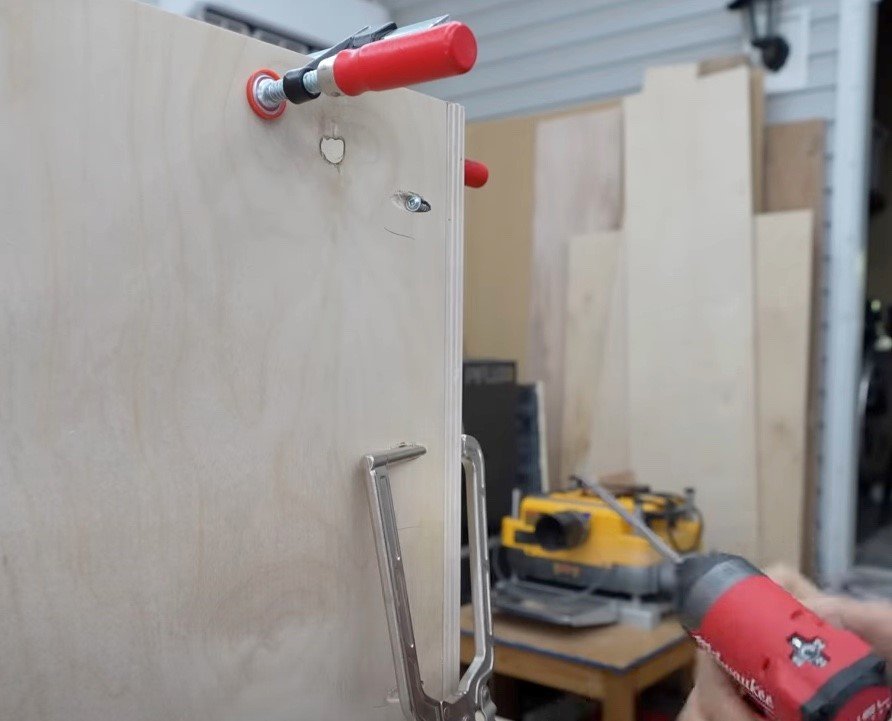
Using the Kreg pocket hole clamp makes fitting these pieces together easier.
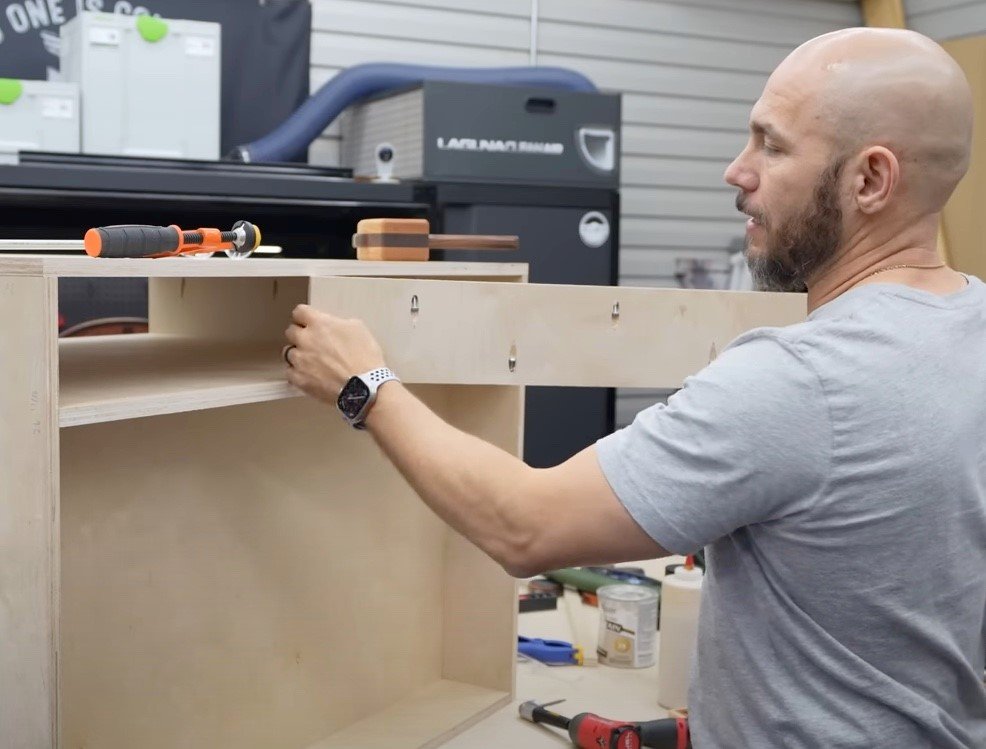
After driving all of the pocket screws into the bottom, I moved on to the top. I’ve drilled pocket holes into the side panels that I used to screw into the top piece. Even though I’ll be putting in a shelf for that pass-through under the planer, I’ve learned from experience not to jump ahead to the attaching the shelf, which would make those pocket holes to attach the top inaccessible.

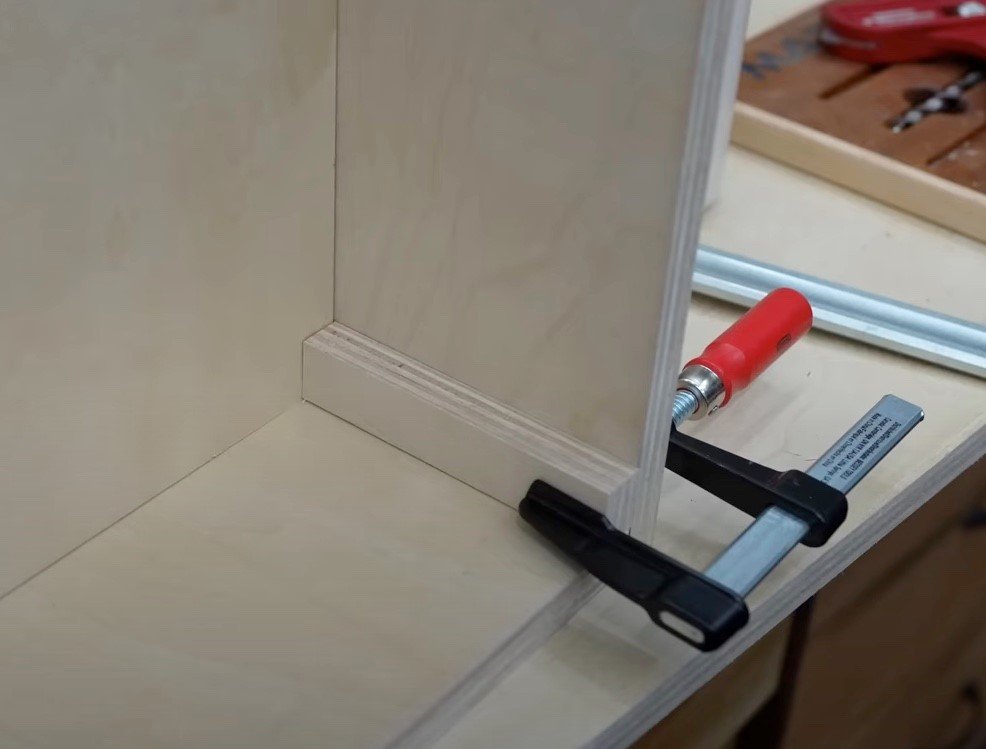
These corner blocks are handy to have to keep everything square and aligned during assembly.
For putting in my shelf, I cut a scrap stick of plywood 20½” and used that height to set my corner guides. I can then use the corner guides to set my shelf in. A word of caution – if you do like I did and don’t double-check the measurement for your top against the assembled bottom, you could end up with a top that just a bit too small or too large. In my case, mine was a hair too small, which in turn made the space for my shelf too tight. If you don’t have any kind of corner clamps, you can just cut 4 equal pieces of plywood, clamp them to the sides, and then set your shelf in on top of those.

You can use these corner clamps to support the shelf that’s being installed.
Now, I picked this height so I would have that 5” opening for the pass-through under the planer, and the cabinet below for the spindle sander and air compressor. If you don’t have those types of tools you’re storing, you can adjust your shelf or shelves to suit your storage needs.
Making the Clamp and Finishing Storage – My original idea was to cut a ¼” piece of plywood and cover the entire back, leaving only the opening to access my spindle sander and air compressor. Once I started building the cart however, I changed my mind to maximize the usefulness of it. Instead, I cut a piece of plywood to set inside the bottom cabinet area. The good news is that I was able to reuse that piece I messed up that was supposed to be the top.
After putting pocket holes into the back panel, I set it into the cabinet with the pocket holes turned in. I didn’t use glue on this panel for a number of reasons, but I’ve got 14 pocket holes drilled into it, so it’ll be fine, and it fit like a glove. In addition to the added storage opportunity this back panel gives me, it also added structure to the overall cart. With the divider added to the top shelf, this cart will be able to easily hold all the weight I’m going to put on it without bowing.

I designed this cart on the fly, so I could custom fit the supplies I used most often
I used a stop block to ensure the back wall of the cabinet was in the right spot before attaching.
Since I was designing this shelf area on the fly, I knew I needed a minimum of 24” on the other side to account for the sander and if I decided I wanted to put doors on the front. On the back, that would give me about 5” from the edge. If I put a ¾” strip across the front to hold things in, I would have enough room to fit a quart can or bottle of glue perfectly.
To make installation of that new back panel easy, I cut 4 strips 5” long to clamp down in the back corners. From the inside of the cabinet, I was able to then just push that back panel up against those clamped strips and screw down those pocket holes. With the corners screwed in, I moved the strips to the center just to make sure I didn’t have any bowing.
Installing the center divider
Once the back panel was in, I moved on to the shelf divider for that top shelf. Because of the narrow space, I added the screws to the pocket holes before putting that divider into the shelf space. I also cut a scrap strip that was 19 1/8” long to ensure I put the divider directly in the middle. In order to screw the divider in, I had to use a right-angle attachment on my impact driver. With the scrap on the opposite side of the divider from the screws, and two clamps adding pressure, I was able to drive in those screws without the divider moving on me.

This is a handy right angle attachment that fits almost any drill or 1/4” impact driver.

This attachment allows you to drive screws in small spaces.
Finishing out the back storage – The beauty of woodworking is that you can customize any project to fit your needs. For me, I cut two more pieces the same depth as this new back storage area. One will be a divider in the middle, and the other will be a shelf on the right side. This gives me room on the right to store taller things like glue bottles on the bottom, but there’s still plenty of room on top of the shelf to store quart cans of finish. The left side is left open to make a clamp rack. I attached both the divider and the shelf with more pocket holes.
For the two shelves on the right, I cut two strips of plywood 1½” tall to act as a ledge to hold everything in when you roll the cart around. I just glued these strips down and help them in with clamps until the glue dried.

Custom DIY clamp storage onboard the tool cart
For the clamp rack, I took some scrap plywood and ripped it down into some pieces that were 4”-wide with a 30-degree angle on the bottom. To make the clamp bracket, I glued two of these pieces together then glued those to a scrap separator, and finally glued all of that to a third piece. With those brackets made, I just glued those straight to the station itself without screws or brad nails. I used CA glue to help them hold faster, but there is also some wood glue to hold them permanently.
Adding the casters – I originally was going to use the same shorter casters I have on my other cart, but I do have some larger casters in the shop, and I think these will roll around a little easier.

Adding heavy duty casters to this tool cart makes it mobile!
This is a pretty simple process. You just cut four plywood blocks to the size of your casters. Once you have those, flip the cart onto its face and attach one block to each corner. I just used glue and brad nails to hold them in place while I screwed the casters in. The screws from the casters were long enough to also hold the blocks onto the cabinet.
Finishing out the doors and drawers – I originally intended to build drawers all the way around for that top shelf, but as I thought on it, I realized that I had some Milwaukee jobsite small parts organizers that fit perfectly. For a beginner, making drawers can be really intimidating. It really can, so by all means you can make that top shelf to fit some small parts organizers for your shop. I ultimately decided to use those parts storage cases on the one side that would ultimately be the pass-through under my planer.

Perfect small parts storage on board the tool cart!
For the drawers, I’m going to use a track saw like before to cut an approximate width, but I’ll cut those down to exact width on the table saw. I’ll then cut them down to length on the miter saw and bring them back to the table saw. I’ll use one of my Kreg set-up blocks to set the table saw blade exactly ¼” deep as well as ¼” from the fence. With that set up, I cut a ¼” dado slot in each side of the drawer pieces. I cut the height on the back piece so it would be flush with the top of the dado grooves.

I cut my drawer bottoms about 1/16” narrower than needed. This makes assembly easier.
I assembled the drawers upside down using glue and pocket holes. This way the back piece would be flush at the top to the other pieces. With that done, I slid the ¼” plywood piece into the grooves. I like to cut my drawer bottoms 1/16” shy, both wide and deep, so I’ve got plenty of play for lining everything up. I then drove a couple of brad nails in to hold that bottom piece in place.

Using a scrap spacer ensures the drawer slides are installed in the perfect spot.
For the drawer slides, I set the height on the slides with a piece of ¼” scrap, then I used a piece of ¾” scrap at the face to set the depth for the slides. This will give me the reveal I want when I attach the drawer faces.
I went with a 1/8” reveal, so I cut a 1/8” piece of scrap to set the drawer face on. When I put drawer faces on in the shop, I just eyeball the setup distance left and right. Once I got it about where I wanted it, I tilted the drawer face out a little to put on some CA glue, sprayed the accelerator onto the drawer itself, and pressed the two together until it bonded. With that dried, I was able to drive two screws in from the backside to attach it permanently.

I use CA glue to temporarily stick my faux drawer fronts on. This sets them in place, then I can use screws from inside the drawer to attach the face permanently.
For my large tool storage, I cut another divider for the bottom cabinet, leaving an inset the thickness of plywood. This would give me the ability to add cabinet doors that when closed would be flush with the face of the bottom cabinet.
Once I cut the two doors to size using ¾” plywood, I used the Kreg hinge guide. It makes putting hinges on extremely easy. I used Blum flush-mount hinges. They’re easy to install, and they’re just good hinges. I used my combination square to mount the door handles about an inch away from the edge and an inch down. The drawer pulls I mounted to the center of the drawer. When you install hardware like this, make sure you level everything, because if your handles are off then your doors and drawers will look off.
I chose low-profile handles for this because knobs tend to stick out a bit and snag on aprons, carpenter’s loops on tool belts, things like that.
Adding the handle and rear storage - For the pull handle and shelves, I cut the plywood parts 3½” wide, with the sides for the handle taller than the cart itself. I used my glue bottle to mark a round-over on the tops to cut with my jigsaw. I used a 1¼” forstner bit to drill out a recess for the dowel that I’m using for the handle, making sure to not drill all the way through.
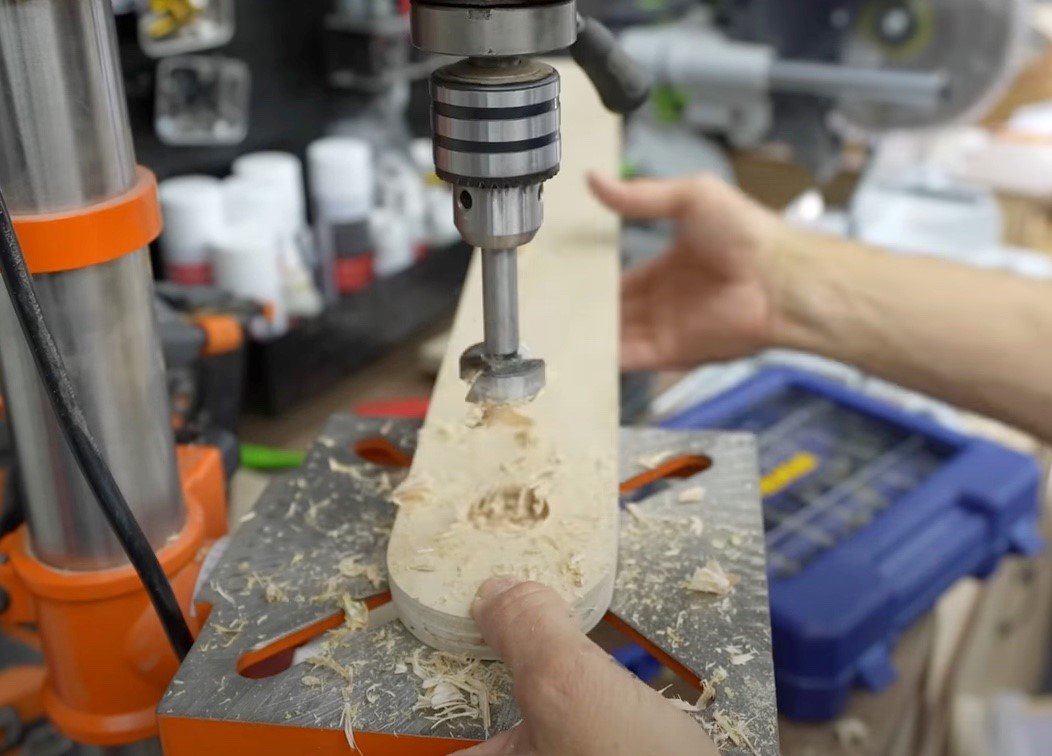
I used a forstner bit to bore a hole about half way through the plywood. This is where the handle will fit.
For the three shelf pieces, I put two pocket holes on each end to connect to the sides, as well as two pocket holes towards the front to connect everything to the cart. Just like I did with the finishing and glue storage on the side, I cut three pieces about 1¼” that I glued down to use as stops on the edge of the shelves. Once it was attached, I realized I messed up. The handle is up too high and interferes with the raise/lower handle on the side of my DeWALT planer, so I had to flip my planer around. If you have the DW735, and you build this cart, be sure to account for that when you build your pull handle.
On the left side, for the storage of my rulers, I cut three pieces the same width as the pull handle upright, cut those down on the miter saw with 45-degree edges, then took those back to the drill press. Using the same 1¼” Forstner bit, I drilled through-holes in two of the pieces and just a recess in the bottom piece. I attached these using just some CA glue. On the right side I just attached four battery storage hangers that I picked up from Shop Nation. He makes these hangers for a variety of cordless tool batteries.
Finishing – I didn’t spend a whole lot of time sanding this. I just used a 120-grit disc on my palm sander and ran it over the edges and faces. I mainly just wanted to take off the sharp corners. To keep the cart cost-effective, I didn’t trim it out like I have with other shop projects in the past. Everything was going to remain just the bare wood.

I glued two pieces of 3/4” plywood together and attached them to the bottom of the tool cart to add extra support. This keeps the cart from bowing and racking during movement.
Once everything was assembled, I got to thinking about how much weight would be on this cart. I was concerned that when I start rolling this cart around on my uneven garage floor, the cart might start racking from side to side due to all the weight. To account for this, I cut two 2¼”-wide strips of plywood that I laminated together to make braces. I made four of those braces, two long ones to run the length of the cart, and two shorter ones for cross pieces between them. I then attached them to the bottom of the cart using pocket holes and glue.

Adding cross supports between the long supports ties it all together.
Loading the cart – In the cabinet below I put in my air compressor, spindle sander, and blower. I don’t use any of those tools very often, so this will keep them accessible but out of the way. On top, I put my DeWALT planer and my Wahuda jointer. I mounted the jointer to the cart using 1¼” pocket hole screws. These are enough to keep it from moving around, but still short enough that they won’t go all the way through the plywood and interfere with the drawer below. I did the same with my planer, but with longer screws to account for the planer’s taller base.

I used screws to secure the planer to the tool cart
Final thoughts – I left the end opposite the handle blank because in my shop it’s going to be pushed up against a wall when not in use. Based on your needs, you could certainly add more storage there. Since the cart is intended to be moved around, I also added some magnetic closures to the insides of the cabinet doors.
You can watch the complete build video here - https://youtu.be/a8NPf1CcXeM
Affiliate links are used on this website to help support the website. For more information, read our affiliate disclaimer.
Tools and Products Used to Build The Tool Cart
Massca M2 Pocket Hole Jig - https://amzn.to/3Lzawet
1 1/4" Pocket Hole Screws - https://masscaproducts.com/collections/pocket-hole-screws-plugs/products/1-1-4-coarse-thread-8-zinc-pocket-hole-screws-150-units ?aff=3
End cap storage gives me a place to keep common hand tools and more!
Massca Jig Mounting Board - https://www.creativetoolco.com/collections/massca-products/products/massca-pocket-hole-jig-mounting-system
Milwaukee M12 Drill/Driver - https://shrsl.com/41yl3
Rockler Bench Cookies - https://amzn.to/3LCmYtR
Festool Track Saw -https://amzn.to/4260CrV
TSO Track Square - https://bit.ly/3Cw2HSd
Festool Dust Port Cover - https://tidd.ly/3RryWYm
Jessem Stock Guides - https://amzn.to/3nvXFla
Clamping Squares - https://lddy.no/1d7gu
Small Bessey Clamps - https://amzn.to/42jEgmm
Kreg Pocket Hole Clamp - https://amzn.to/3nrrwLL
Parallel Clamps I Recommend - https://amzn.to/4270PLl

I added ruler storage in the corner of the tool cart
Squeeze Clamps - https://lddy.no/1d7gv
Right Angle Drill Attachment - https://amzn.to/41aFkbg
Chisels - https://amzn.to/3VDuN72
Kreg Setup Blocks - https://amzn.to/419Fu2o
Battery Holders - https://tidd.ly/3CV9WVf
Kreg Hinge Jig - https://amzn.to/419Debm
Hinges - https://amzn.to/42sf5hv
Forstner Bit Set - https://amzn.to/3VDYFk4
Drawer Pulls - https://amzn.to/3Vyu47p
Spring Punch - https://amzn.to/3VDgYpx
3" Casters - https://amzn.to/3VDhcgn
Drawer Slides - https://amzn.to/3VFbjPx
Titebond 3 Wood Glue - https://amzn.to/3HGGMv3
CA Glue - https://amzn.to/3AUYS8S
Tools Stored On the Cart

I designed the cart so that I could remove the small parts organizers easily and that gives me a pass through for planed boards.
Milwaukee Parts Organizers - https://homedepot.sjv.io/3PgENd
DeWALT Parts Organizer (will fit in the opening) - https://amzn.to/42qTjKR
DeWALT Planer - https://amzn.to/3AXGLz3
Wahuda Jointer - https://amzn.to/3pbY9gO
Spindle Sander - https://homedepot.sjv.io/e4YNGj
Air Compressor - https://amzn.to/3AW46Bl
Jorgensen F Clamps - https://amzn.to/3M0vuUM
Bessey F Clamps - https://amzn.to/428NFNW