
The Best Miter Saw Stop Block System on the Market!
Ultimate Miter Saw Station Upgrade
I built my miter saw station just a couple of months ago, and I’ve been extremely happy with everything about it except for the stop block system. The stop block I originally used is essentially a little piece of plastic held in place with a thumb screw. Every time I bump a workpiece up against it, the stop block moves. I can’t take it anymore! It’s not accurate. I decided to pick up the Woodpeckers Stealth Stop system, and WOW, is it awesome. Let me tell you how easy it was to install and how amazing it is!
Tools Used in this Install:
Woodpeckers Stealth Stop System https://amzn.to/3LGfgie
DFM Small Square - https://amzn.to/3AW4W0T
CA Glue - https://amzn.to/3NJp2mz
Tool Wall I Have - https://amzn.to/4191s5N
Festool Kapex Miter Saw - https://amzn.to/429pwqi
Affiliate links are used on this website to help support the website. For more information, read our affiliate disclaimer.
There are two main reasons I decided to change the original system. The first is the stop block itself. It’s just no good. It just doesn’t tighten down enough to keep it from moving. And second, the tape measure on my old stop block system wass completely inaccurate.

The old stop block
The reason I chose the Woodpeckers system is it’s the easiest, fastest system you could install. It’s strong and secure, and the stop blocks won’t move on you. Also, the stop blocks are micro-adjustable. The track that comes with it can also be set up in multiple configurations. If you wanted to set two of the tracks up so that you had a back fence all along your station, you could do that and have two stops. I decided to just go with the one track flush across the table so that I can continue to use the station as additional work surface. The back fence configuration would disrupt that.

Before install I sit the new StealthStop up in this configuration where you have an actual fence that stands up vertically from the miter saw station surface. I didn’t want a vertical fence on mine, but it’s an option with this kit that you can choose if you wish.

Woodpeckers Stealth Stop can be used in a few configurations. One is with both an under mount and vertical fence as shown here. You can use only the vertical fence, or only the below the surface mount, which is the way I chose to install mine.
Also, if your saw comes with adjustable or removable fence built in, the added back fence would interfere with your ability to move or remove your saw’s fences. But, if you wanted to use that set up, the system comes with brackets that fasten to the two tracks using t-nuts. Once the brackets are tightened down to the two tracks, you can then attach the bracket directly to the bench
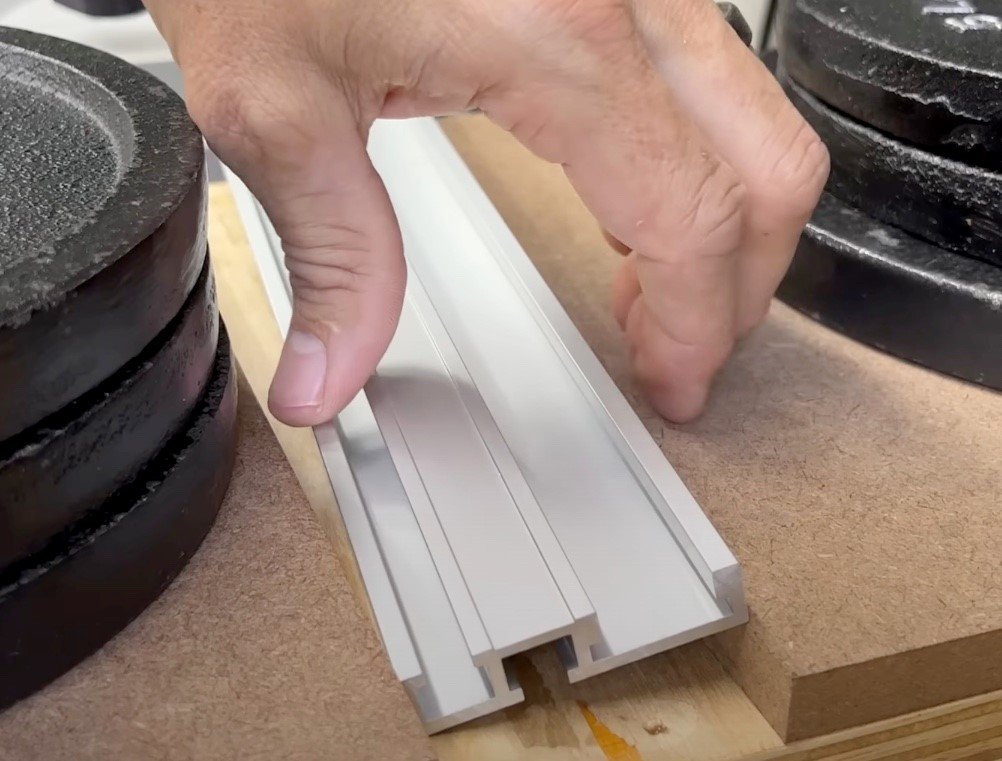
On the flush-mount track, they recommend setting the back side of the track ¾” behind the face of your saw’s fence. There’s a couple of ways you can install this once you’ve got the distance set. You could rout out a channel that’s 2¼” wide by ½” deep. I opted to make a new top for my station by adding ½” thick MDF. I cut it so that I can sandwich the track in between pieces and glue it to the existing top. I immediately liked the way it looked, and I didn’t have to rout anything out.

Look at that smile! This is such a better solution! Can’t wait to see the finished product once installed.
Woodpeckers recommends you use either t-bolts or some 7/16” bolts fastened to your workbench then slide the track in place over those bolts and tighten them down from underneath. Since I have drawers below the benchtop, I can’t do that without interfering with the drawers.

I cut my Stealth Stop rails with my miter saw. Just take it slow and let the blade do the work and you can easily cut aluminum with a miter saw. Not my favorite thing to do, but it works.
With the MDF glued in place and left overnight to dry, I needed to cut the track to fit. I flushed the track up to the end closest to the miter saw and marked the other end where I needed to make my cut. I don’t like cutting metal on the miter saw, even aluminum, because I feel it’s pretty hard on most miter saw blades. However, the aluminum does cut pretty easily with most blades. Once cut, I checked the fit on both ends then installed it with CA glue. With a little activator sprayed on the backside of the track, that glue will set in a matter of seconds. I then repeated the process on the right side of the saw using the offcut from the track and two more pieces of the MDF.
And then I realized I had almost made a major mistake! I glued the track in backwards. Fortunately, I caught it just in time before the glue set in. I had to clean the back of the track using my sander, and I chiseled out the set glue on the worktop.
Ooops! I put it in the wrong way! Luckily the glue hadn’t fully set!

I used a chisel to clean up the dried glue before re-installing.
For my extension wing, I had to turn the track around backwards to line up correctly. A less lazy guy would just rebuild the table on that wing, so everything would match up, but I’m not that guy. I just don’t use that wing very often, but when I do, I wanted to be able to use the stop block system.
With the new tops on the side tables and the tracks in place, I needed to level my Festool saw to the sides. To do that, I cut some shims that are just shy of ½”, but because the Festool Kapex has rubber feet that compress when you tighten the tool down, I had to add some washers so that when the feet do compress, the saw is still perfectly flat to the work surface. I also used the straight edge from my level to make sure the saw fence was perfectly flat to the track on both sides.

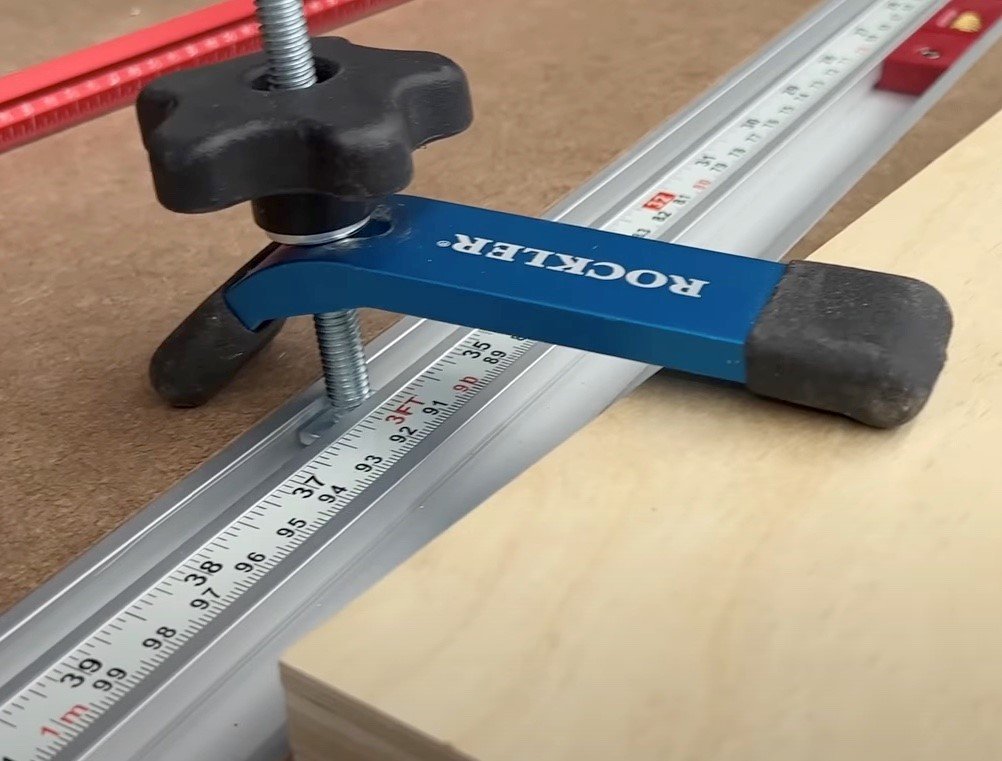
I used a ruler to set against the blade and compare to my stick on tape measure to ensure it was exactly set to my blade.

The included self adhesive tape measure works great with this system!
This system comes with a 12’ tape measure in case you need that much. To make sure I got an accurate measurement, I used a metal ruler up against the teeth of the blade then lined up the tape to match the measurement on the ruler. The metal tape is very hard. I tried cutting it with snips, but that didn’t work, so I had to use a box cutter.
There are a few features the led me to choosing this system, along with a couple of things I don’t really care for. You have to take the good with the bad, though. I’ve got four of the stop blocks, with two on the left side of the saw, one on the right, and one on the wing. The main reason I chose this system is that I can lay the head on those stop blocks flat, and they won’t affect any stock I’m working with. When I need them, I can pop those heads back up and use them for repeated cuts.

Setting the stop blocks to the exact measurement is easy!
To set the blocks up you can loosen the hex bolt in the body of the stop block, and then set it wherever you need it to be. One complaint I do have is that the tape measure has both imperial and metric on it. I understand why they included both millimeters and inches, but for us Americans, I think we’d prefer the imperial line was marked all the way across the tape. To set these, I just use my DFM small square across the head of the stop block, line it up, then tighten down that set screw.

The inset thumb screw allows for micro adjustments so you can dial in your cuts. If accuracy is important to you, I don’ think there’s a better system on the market right now.
With the stop block set, I can then use the dial in the body to micro-adjust the setting. This allows you to get close when setting it to then dial it in perfectly. Before you put the stop block in the track, make sure to loosen the tail piece a little bit to give you that micro-adjust flexibility. When I first installed the blocks themselves I had the tail tight to the body, so there was no adjustability. I thought they were messed up, but that wasn’t the case.
I like the fact that these blocks are super solid. Once you have them set and tightened down, they don’t move. The previous blocks I had moved slightly just from bumping stock up against them. With these, once that set screw is tightened down, they don’t budge under normal pressure. Not even a millimeter. If you whacked it, you could still make it move, but under normal circumstances it’s not going anywhere. If you choose to install the track to have a vertical fence, it will work the same way.
Another thing I’ve always appreciated about Woodpeckers is that they’re always accurate. The markings on the included scale tape are identical all the way across to the markings on a metal rule that I know to be 100% accurate.

The main thing I appreciate about Woodpecker’s Tools is they are all extremely accurate (even when comparing them to each other). This is the included stick on tape measure on bottom, and a Woodpecker’s Edge Rule on top.
One thing I don’t particularly care for is that you need an Allen wrench or a hex-head screwdriver to loosen and tighten the set screws. I understand why they use those so that everything sits flush under the work surface, I just wish there was another way. I can keep my hex-head screwdriver in the drawer of the miter station though, so it will always be there when I need to use it. Another thing that I think a lot of people won’t like is that these stop blocks are plastic. But the hardware inside them is all metal, and the plastic feels really solid to me.

Stealth stops slide in the track and lay under the surface so they are not in the way when not in use.

Stealth Stops are well made and give quite a bit of micro adjustability when needed.
Something else that will be an issue for some people is the price. This is a Woodpeckers product, and if you know Woodpeckers, then you know their stuff isn’t cheap. The kit I bought was $199.00, and the reason I chose that one is I wanted that extra track. I initially thought I would want that vertical fence set up, but once it got here, I decided I’d rather just have it all the way out on the wing.
You can also use this Stealth Stop to add clamping to your miter saw station with T-Track clamps
Standard t-track bolts won’t fit in the slot at the back of the track, but a t-bolt will. That means you can add some clamping capability to your workstation. With my set up, I’ve got about 6’ 8½” of capability with the stop block all the way at the end on the wing. Is this system worth it? I personally think so. I wanted a solid system that I could depend on that would be accurate. I trust Woodpeckers tools. I think they’re well-made, and they’re backed by a lifetime warranty.
You can watch the full video review here - https://youtu.be/FXXIV2o5wrw
Related Articles:
How to Build a Miter Station (with plans)