
Oliver Benchtop Planer Review
Oliver Thickness Planer with BYRD Shelix Cutterhead and Wixey Digital Readout Display
The Oliver Planer is quite possibly the best benchtop planer that you can buy. In this review I’ll tell you why I think that based on one major feature! Let’s go!
Tools discussed in this review:
Oliver Planer - https://amzn.to/3o9ivHa
Mid-Range Pick - DeWALT Planer - https://amzn.to/3UuVudG
Budget Planer Pick Craftsman Planer - https://amzn.to/3GEZumi
Affiliate links are used on this website to help support this website. For more information, read our affiliate disclaimer.
Let’s start this review at the top of the machine and work our way down. It has tool storage on top, like most planers do, so you can get access to the helical head. Getting access to that head is extremely easy. You just take the dust cover off, then you unscrew two bolts on the cover, and there it is. You can change those blades super-fast and you’re back at work.

Top of Oliver Benchtop Planer
Also on top is the crank handle for raising and lowering the carriage, and it is extremely smooth. There’s also a nice thickness scale in the lid, from ¼” all the way to 1¾”. When you’re planing boards and you need a rough idea of where you’re at while you’re planing, you can just set your board up into the scale and see.

Thickness scale on top is handy for checking thickness of material at a glance.
On the backside, you have the dust port, and it comes with an adapter, so you can easily hook it up to a shop vac. The dust extraction is fan-assisted, so you do not need suction from your dust extractor. You can just have a bag, you can run a hose outside, whatever you need.
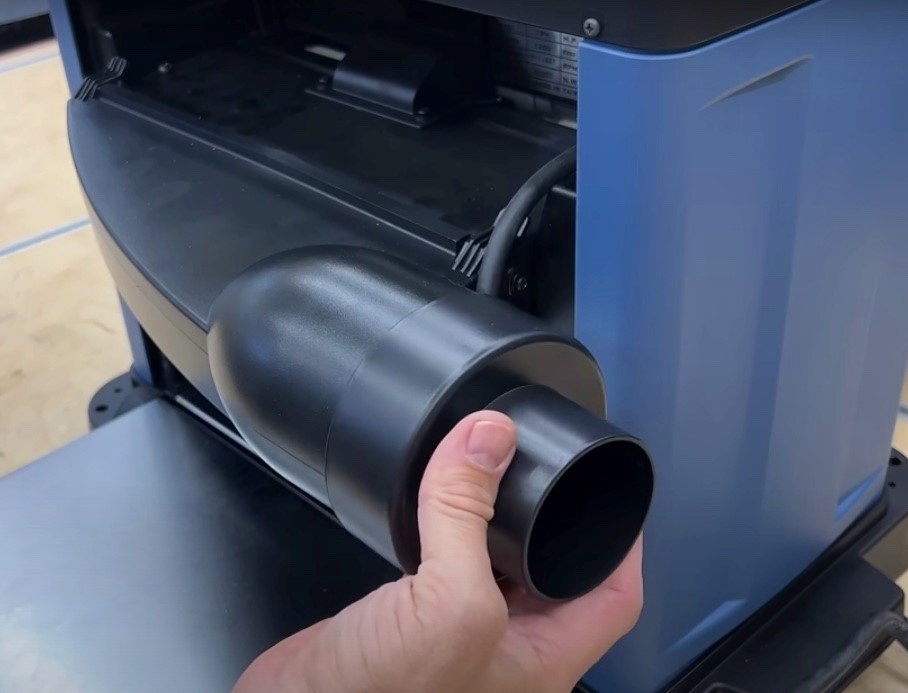
Oliver has a dust port adapter that will allow you to fit most shop vac hoses.
It’s powered by a 115v, 2 HP, 15amp motor, so you’re going to have plenty of power to plane through any wood you want. On the right side of the machine, you have a scale with an indicator that lets you know about where you’re at, and the indicator is adjustable, so you can fine-tune the scale to get it exactly where you want it.

High contrast scale for setting thicknesses.
In the center of the machine, you have a depth gauge that lets you know about how much material you’re going to be taking off with each pass. I really like this, and I use it on the DeWALT 735. It’s a really great feature to have.

Depth of cut gauge
On top of the carriage, there’s a carriage lock handle. That handle locks the carriage down and doesn’t allow it to move up when the board passes through it. If you saw the Craftsman review video, you may have noticed that when the boards were passing through, the carriage lifted up slightly each time. That would cause a little bit of inaccuracy if you’re trying to get to an exact thickness.

Carriage lock prevents the carriage from moving during planing operations.
One premium feature is the Wixey digital readout gauge. You can set it to both millimeters and inches, depending on what you want. Where this gauge is really going to shine is when you need to dial-in a specific cut thickness. For example, if you needed to take off just ⅛” and no more, you can zero out the gauge against your board, then lower the carriage by just ⅛”. Whenever the digital gauge gets close to the nearest fraction, it will show that fraction on the readout.
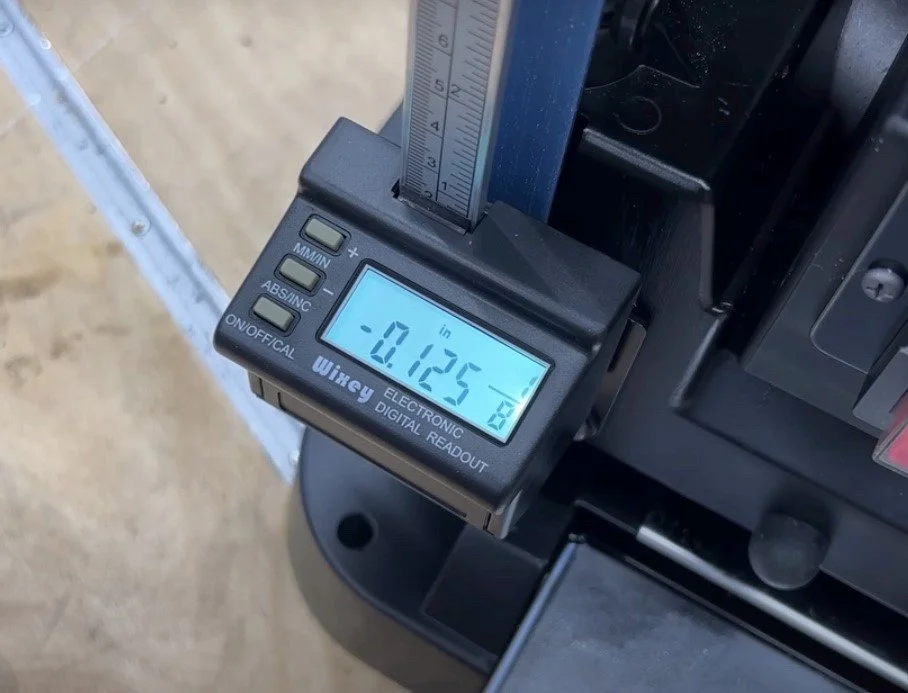
The Oliver planer has this Wixey electronic digital scale. I love this feature of this planer!
According to Oliver, this machine weighs about 68 pounds, and I concur. It’s pretty heavy. I do like that the cast base, probably aluminum, has the carry handles on the bottom. A lot of planers have the handles on the top. I like the handles on the bottom because it’s just easier to move around.

Oliver planer has depth stops at common thicknesses.
There are four preset depth stops on the side, and the extension tables do fold up. The front table folds all the way against the carriage. However, the back one hits the dust extraction and doesn’t go flat to the machine. The DeWALT does that too. If you’re going to make the tables fold up, make them fold up. Although, because the dust extraction is there, it would have to be redesigned in order to fold the table flat.

The star of the show! The Byrd Shelix Helical head comes pre-installed from the factory. This is what sets this portable benchtop planer apart from the competition.
The star of the show here, the reason you’re paying big dollars for this machine, is the Byrd Shelix head. So, what’s the difference between a Byrd Shelix versus a spiral head? You’ll see some jointers and planers advertised with a spiral head. A spiral head cuts square, or 90-degrees to the board. A Byrd Shelix head has those blades angled so that it’s actually slicing the wood. In theory, you’re going to get a cleaner cut. This one has 36 cutter heads. If one of them gets nicked or dinged, like if you accidentally hit a nail or a staple, you’ll start seeing that spot in your planing. This is where those heads shine. All you have to do is loosen that one head, turn it a quarter-turn, and you can continue on because each head has four sides to cut with. With a straight-knife planer, like the DW735x, once you get a nick in that blade, you have to change out that entire blade.
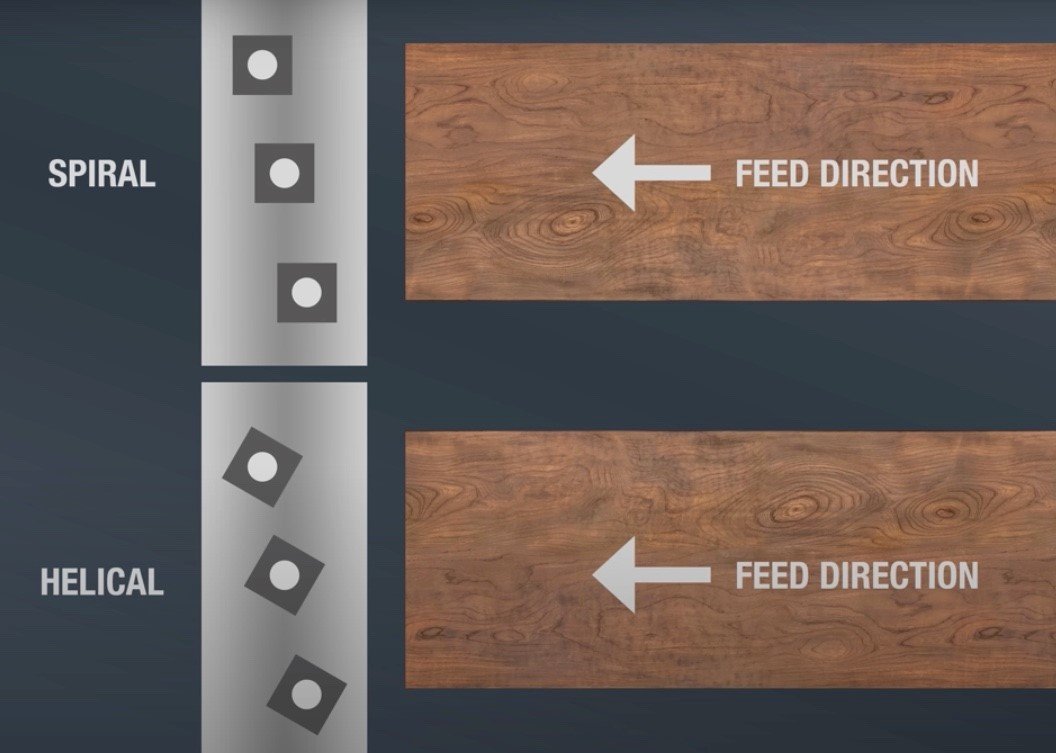
What’s the difference between helical and spiral cutter heads?
The power switch on the Oliver is a magnetic power switch. That means if you power the machine on, then lose power while you’re planing – say the electricity goes out or you trip a breaker – when the power comes back on, the Oliver will not come back on. You have to manually turn the power button off, then press the power button again to restart it. It’s a really good safety feature that keeps you from getting hurt if the power goes out then suddenly comes back on. I tested this on the DeWALT, and when the power was restored the DeWALT planer immediately came back on. Oliver wins that one.
I ran a board of hard maple through and got a nice finish somewhere between 120- and 180-grit. The other side of the board had a lot of tear-out from a previous plane. After several passes, that side came out pretty clean too. With the carriage locked down, I didn’t get any snipe on either the maple or the spruce that I ran through it. Without the carriage locked down, I got a tiny bit of snipe on the spruce, but I didn’t get any on the maple. I really appreciate that it’s perfect, or nearly perfect, from the factory.
I did notice a little bit of sawdust inside before I ever planed anything. That’s because Oliver will plane a board first to make sure everything is dialed in before they ship anything out. However, if it’s knocked out slightly, or just needs to be dialed in a little more to eliminate snipe, there are some adjustment screws just under the tables. The instruction manual tells you exactly how to make those adjustments so there’s no guesswork.

Oliver planer beds are adjustable to remove any snipe (Mine were perfectly adjusted from the factory)
For a lot of us, when we start looking to upgrade to a better planer, or buy a higher-end planer, a lot of people gravitate to the DW735x. It’s been a staple in a lot of woodworking shops. It’s a really good planer, and there’s no denying that. I’ve been happy with it, but the Oliver is a bit of an upgrade with the helical head and the other features that you get with it. I do think it’s worth the extra money, especially if you’re looking to put a helical head in the DeWALT. If you wanted to upgrade the DeWALT, you’re looking at adding another $550ish to it if you added it yourself. It would be $1,600 total if you let Byrd add the Shelix head to it. So, why not just get the Byrd Shelix in the Oliver? Yes, you’re giving up a half-inch of width from the DeWALT’s 13” bed.
There are a couple of things I do like better on the DeWALT. One is the speed at which you can raise and lower the carriage because of the four threaded posts at the corners. You can fully lower the DeWALT in 23.1 seconds compared to 29.04 seconds it takes on the Oliver. DeWALT also has the added depth stops, six compared to Oliver’s four, and two speeds. The depth gauge for how much material you’re removing is also better on the DeWALT than on the Oliver. The fan-assisted blower works much better on the DeWALT than on the Oliver; I did need a little bit of suction on the Oliver to pull all of those chips out.

If this planer has an Achille’s heel, it’s that the top is plastic. Not a huge deal, but I think this should have been made out of a more durable material. Especially at this price point.
The DeWALT’s plastic top piece is also more robust than the top piece plastic on the Oliver. The Oliver’s top flexes a decent amount. I worry that if you’re planing something like an 8/4 chunk of walnut and you lay it on top a little hard, it would likely crack that top piece. There’s just a lot to like about either planer. All in all, I really don’t think you could go wrong with either one, just depending on what you’re after.
You can watch the full video review here - https://youtu.be/kMeNcyDqJ8Q