
How to Build a Cable Free Desk with Built-In Outlets, USB and LED Lights
How to build a cable free desk with built-in power outlets, USB ports, undercount RGB LED lights and more!
Step by step build plans here: https://www.731woodworks.com/store/desk-with-wire-management-build-plans

Check out the video below to see how it all come together!
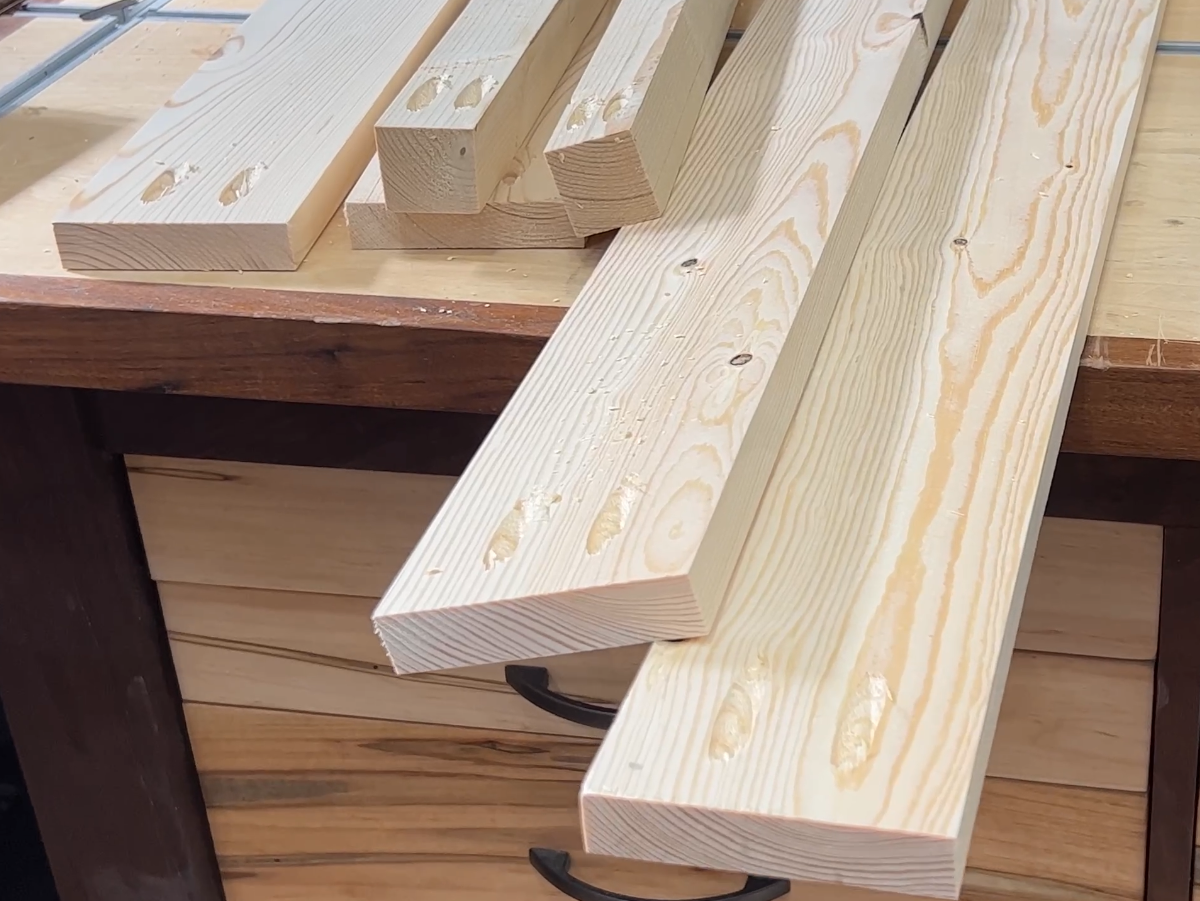
My son was using a plastic folding table for his computer desk in his apartment. We had to fix this! I went to the store and bought five 1x6x10 common spruce boards and three 2x2x8 pine boards. That’s all of the lumber you need for this project.

pop up wireless charger for the desk
I also bought some cable management accessories to keep the desk and work area nice and tidy. Having a mess of wires all over and under the desk makes for a chaotic workspace and decreases productivity. My desk design features a wireless charger that pops up out of the desktop to give you access to more outlets, USB ports, and more. It also features a trap door to give you access to a cable management tray that is hidden from sight when the door is closed. We installed undercount LED lights to give this desk a unique look.
Amazon and other affiliate links are used in this blog post to help support our website.
Below the supply list is the blog post showing detailed pictures and a description of the project
Build Video
Full List of Tools and Supplies:
Tools:
Massca M2 Pocket Hole Jig: https://masscaproducts.com/products/massca-m2-pro?aff=3
Wahuda Jointer: https://amzn.to/3sQPj6r
Table Saw: https://amzn.to/3LFkqKO
1/8” Roundover Bit: https://amzn.to/3H1NatA
Supplies:
5 = 1x6x10 Spruce or Pine Board: https://www.homedepot.com/p/1-in-x-6-in-x-10-ft-Select-Pine-Board-929117/202535855 (you can usually get them MUCh cheaper at a local lumber store ask for paint grade or appearance grade spruce)
3 = 2x2x8 Pine Board: https://www.homedepot.com/p/Alexandria-Moulding-Douglas-Fir-S4S-Mixed-Grain-Board-Common-2-in-x-2-in-x-96-in-Actual-1-5-in-x-1-5-in-x-96-in-102X2-DM096C/206876538
1 = 1 1/4” Pocket Screws: https://masscaproducts.com/collections/pocket-hole-screws-plugs/products/1-1-4-coarse-thread-8-zinc-pocket-hole-screws-150-units?aff=3
Table Top Fasteners: https://amzn.to/3GYNYj1
5" Hole Saw (for the pop up charger): https://amzn.to/3gTv1nb (you'll also need the arbor if you don't have that).
2” Forstner Bit: https://amzn.to/3GRmzzv
Pop Up Wireless Charger: https://amzn.to/36fkXCR
Power Strip: https://amzn.to/3uX1hOl
Desk Top Wire Grommets: https://amzn.to/3uWxG7O
Cable Ties: https://amzn.to/3rW5Qqn
Cable Management Kit: https://amzn.to/3uYekiv
LED Lights: https://amzn.to/3Bxbhzo
Cable Tray: https://amzn.to/34Hh1dW
Double Stick Tape: https://amzn.to/3rXIVev
Black Spray Paint: https://amzn.to/3gR44Au
Dark Walnut Stain: https://amzn.to/3GYgEbC
Spray Laquer: https://amzn.to/3JEnsx9
CA Glue: https://bit.ly/3oW8wlZ
How to Build The Wire Free Desk

For this DIY desk I chose to use common spruce and pine boards you can find at your local home store or lumber store. Typically local lumber stores sell this type of wood MUCH cheaper than the big box stores. On the 1x6 boards ask for paint grade, appearance grade or #1 grade spruce boards. They are called by different names but they are smooth surface with fewer defects. Basically these are “ready to paint” when you buy them, reducing the amount of work you will need to do.


Step 1. Cut the boards for the desk top first. I chose 10 foot long boards and cut them in half with my miter saw. If you don’t have a miter saw, a circular saw will also work here. We will cut them to the correct size on each end after they are glued together. I cut 5 of these boards about 5 feet long each. I also jointed each edge of these cut boards. If you don’t have a jointer, you can joint them without a jointer several ways.
Step 2: I applied a good amount of Titebond II wood glue to the edges of three of the boards we just cut.

Step 3: I used parallel clamps to clamp 4 of the 5 boards we previously cut. I also used cauls on each end and in the middle to help keep the desk top as flat as possible while the glue dried. I like to let the glue have plenty of time to dry. Leaving it over night is best but wait at least 6 to 8 hours before taking them out of the clamps. If you don’t have parallel clamps you can use regular F style clamps. I would add a couple of scrap pieces of wood between the clamp and desk top to prevent damage.


Step 4: While the glue is drying on the table top, it’s time to build the frame for the desk. I used some of the 1x6’s left over to cut them to 3 1/2” wide on the table saw. If you don’t have a table saw, just purchase 1x4’s for this part. I will be using these boards for the top apron of the desk frame.
Step 5: I drilled pocket holes in each end of my apron pieces. Set the pocket hole jig for the 3/4” setting since we are using 1 1/4” pocket hole screws for the joinery.

This is a special edition Massca M2 jig. As far as I know, this is the only one made.
Step 6: Assemble the frame using 1 1/4” pocket hole screws to attach the aprons to the legs. I like to assemble my frames upside down so I can ensure the top of the leg and the top of the apron are flush with each other. I also used glue on each of these joints. That will prevent the desk from squeaking as it ages.


POWER TIP: Having a right angle pocket hole clamp will save you a lot of frustration. This keeps the two boards tight while you drive the screw. If you have used pocket hole joinery before you know that the two boards are hard to keep in place while driving the screws in. This clamp prevents that movement.

I assembled the front of the desk and the back of the desk first. In other words, I attached the long apron to both front legs. Then attached the long apron to both back legs. Once those were assembled, I attached the side aprons. I used a 1x6 for the shelf on the back and attached the back of the shelf with pocket screws. This gives the desk a lot of rigidity. I did not plug the pocket holes because they are all on the bottom side or will be covered up by the desk top. If you want to plug them, I would recommend using a 3/8” dowel instead of the plugs. The dowel actually works better in the shallower holes and you can cut them flush with a flush trim saw.
Once the frame of the desk was assembled I cut some slots for the table top fasteners to attach. I sanded with 120 grit sand paper over the entire frame. I also used a 1/8” roundover bit on the bottom of the legs and all of the edges.

Step 7: Since this desk frame was a small, meaning there isn’t a lot of surface area, I decided to use spray paint instead of my paint sprayer. This keeps this project approachable for beginner woodworkers as well. I only used two cans of spray paint to put three total coats on the desk frame. Be sure you are using the paint in a well ventilated area. I like to wear my mask as well.
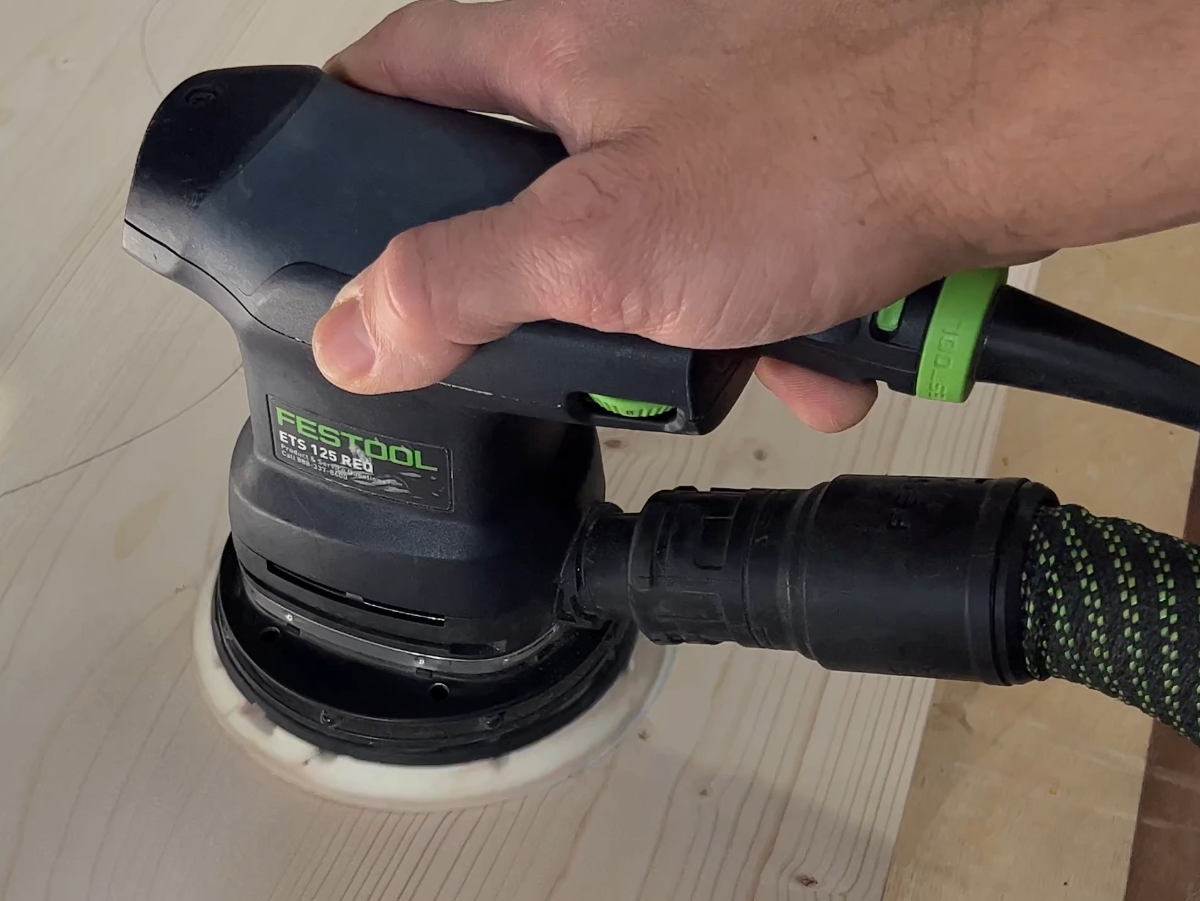
Step 8: After the glue is dray, I sanded the desk top to 120 grit. I have a video on how to avoid swirl marks on your wood projects. The main culprit of swirl marks is an orbital sander when improperly used.
Step 9: Finishing the table top. I stained the table top after it was sanded. I use Pre-Stain Conditioner when staining pine or spruce to prevent a blotchy finish. After the stain was dry I used one can of spray laquer and applied three coats. I waited approximately 30 minutes between coats. POWER TIP! If you use a high grit sand paper (1000 grit or higher) on a sanding mouse between the 2nd and 3rd coats of lacquer, your finish will come out smooth as butter!


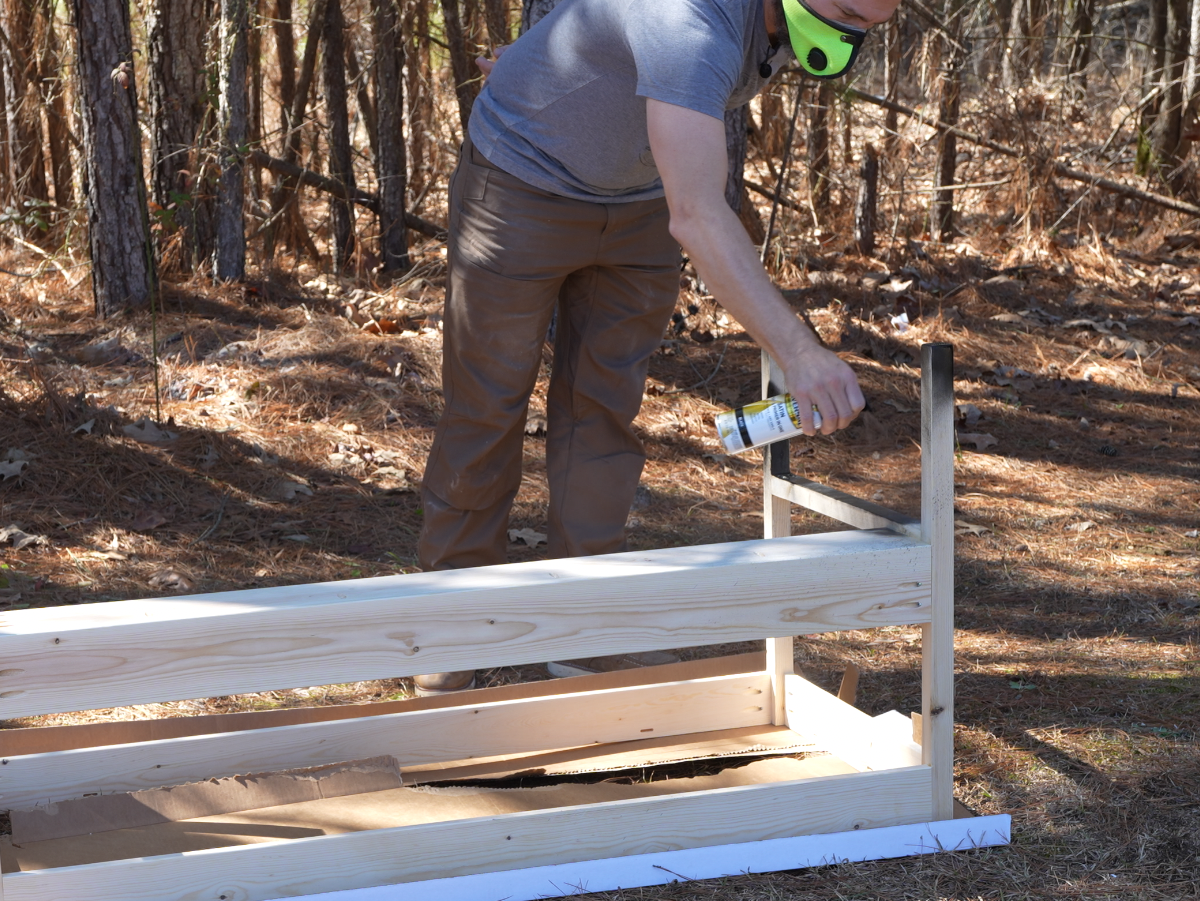
Step 10: After the paint is dry on the frame, I attached the LED lights and the cable management tray. I also installed a center brace that will prevent the desk top from sagging in the middle.

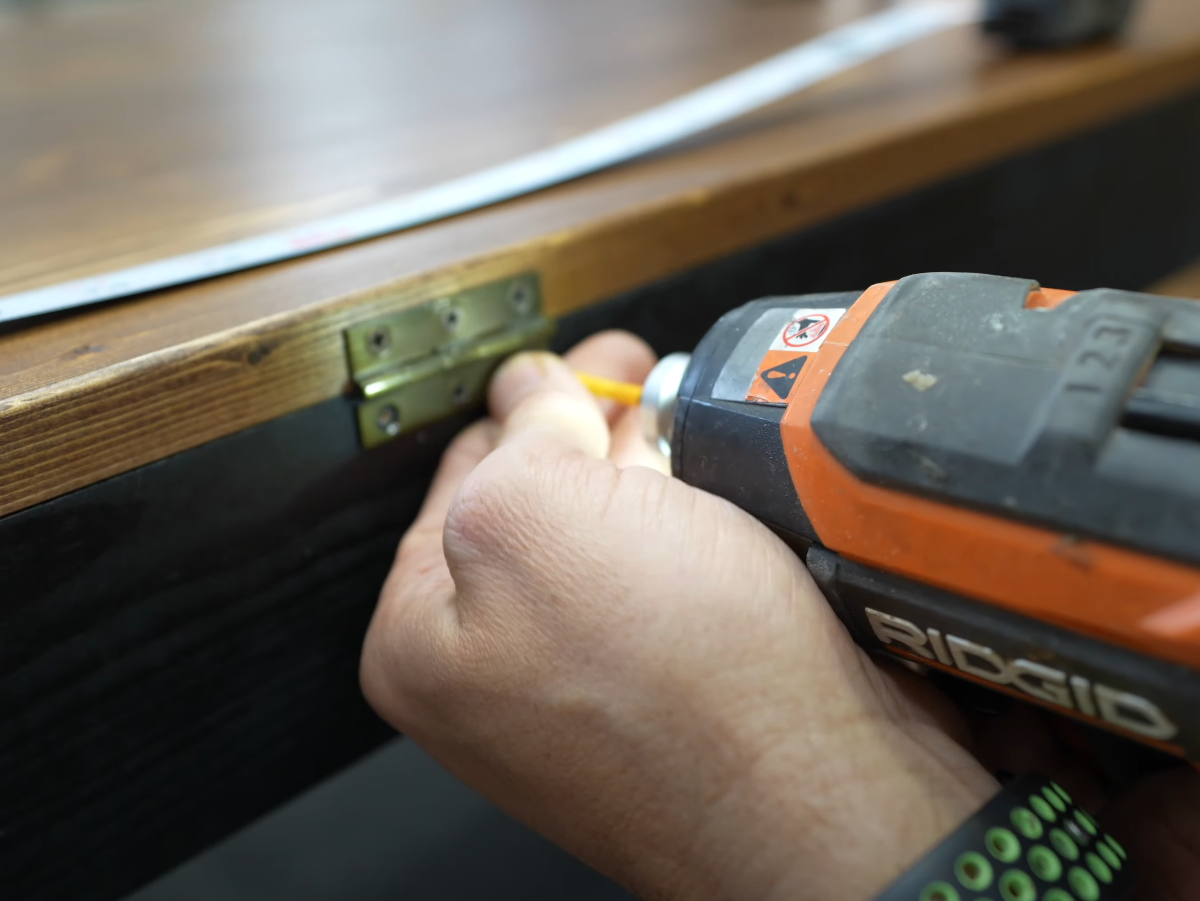
Step 11: Now it is time to prepare the desk top. The first thing I did was installed the trap door using 2 inch narrow hinges. I placed the hinges about 16" in from each end. If you attach the trap door first, you can then use it to align the top perfectly so you don’t have a gap. Before attaching the desk top to the frame, I drill holes for the grommets and for the pop up wireless charger. I used a 5 inch hole saw for in desk pop up outlet and a 2 inch forstner bit for the grommets. POWER TIP when drilling through a top like this, the bottom side will “blow out” or tear out if you drill all the way through. The trick is to drill just until the bit breaks through. Then drill from the bottom into the same hole and that will prevent tear out.


Once you have the holes drilled you can attach the table top to the frame. I use table top fasteners (using the slots we cut earlier). However, if you don’t have a way to cut the slots you can use fasteners called desk top fasteners.

Step 12: Let’s complete your ultimate wire free desk set up! At this point you can run all the cables and wires. Install the pop up charger (if you chose to include it on your desk). The cable management tray really helps keep the wires centralized and easily accessible if you need to change them out for any reason. I attached a power strip to the bottom of the desk using the double stick tape. Adding the power strip helped me with wire management. You can plug your computer, monitor and any peripherals under the desk and hide the wires. I also used cable ties that you can use small screws to attach to the underside of the desk top to keep the dangling wires held tight against the top.


Now you have a wire free, worry free home office or gaming desk to enjoy! Good job!
